Archive

Posts Tagged ‘geek’

Undocking thunderbolt – Apple script

October 4th, 2011 No comments
Thunderbold

Thunderbolt

Last Week finally my long awaited Thunderbolt monitor has arrived. It is breeze to setup like any other Apple product. I use the USB ports that the monitor has in the back and hooked up my back up drive, headset one thing i did not like is there is no “safe undock”. My backup drive is a 2 TB that i have set up for Time machine and every time i undock the Mac complaints about unsafe ejecting of the drive. If you know me i hate when people yank devices out without gracefully ejecting the device. So needless to say the “unsafe ejecting” message was bothering upon searching for a solution i found this little apple script that does the job really well (thanks to Shawn at Chompingatbits.com). This is a simple script that basically sends message to the machine to eject all attached drive now my system is ready to undock. I save the script as a little “Undock.app” and launch it every time i am ready to undock. Here is the process:

  1. Open “AppleScript Editor.app” found in the Applications -> Utilities folder
  2. Paste the following code into “Untitled” applescript window:
  3. tell the application "Finder"
    	eject (every disk whose ejectable is true)
    end tell
  4. Go to File -> Save. Name the file “Undock” and choose “Application” as the file format. You can now run this from Spotlight or create a shortcut in your dock if you prefer; just as with any other application. Your external drives will be ejected after running this script.


Categories: Tech Review, Tech Review Tags:

Creating your own Karaoke system

March 23rd, 2011 1 comment

I like karaoke, my choice of songs are Hindi soundtracks. Over the few months i have been trying to find a DIY solution for a karaoke system. I am always on a shoe string budget, so any thing that will let me do things for cheap (read free) i am all up for it. So this is what i did.

First the hardware:

  • A home audio system
  • Microphone (wireless preferred, i bought this)
  • A simple channel mixer, this is mine
  • Now that you have all the necessary hardware in place, its time to get Karaoke tracks. There are several options you can buy karaoke CDs or use some of the online services like Geetnet, Meragana (huge collection, i would recommend this if you have $). Since i was on a budget i wanted to create my own karaoke tracks. I have invested and built a huge Indian soundtrack collection and also i am not a big fan of having lyrics scrolling before me. I can handle lyrics very well. So after several trial and errors here is a very straight forward process i found to create your karaoke tracks by removing the vocals.

    Removing vocals from audio track

  • Get a copy of Audacity
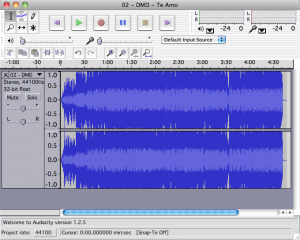
  • Open the mp3 file of your choice in Audacity
  • Open File

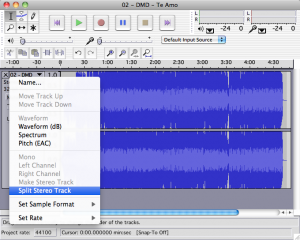
  • First split the track by using the track tools
  • Split Track

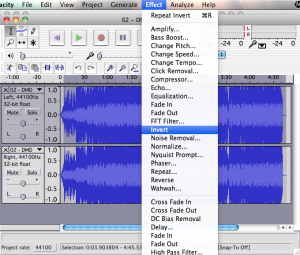
  • Select the left track and apply the “invert” effect, from the “Effects” menu.
  • Invert Effect

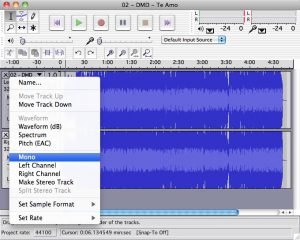
  • Then use the “mono” feature for both the tracks.
  • Mono

  • Save changes and export to MP3.
  • You will need Lame library to successfully export to MP3. Get Lame library here for both Mac and PC.
  • Sample audio

    Original with Vocals

    Karaoke ready version

    Now you have a perfectly optimized sound track for karaoke with reduced vocals. All you have to do now is plug in the audio from PC to the one of the channels in the mixer. Microphone goes into the other channel. Plug the mixer’s audio out to your sound system.

    Happy Karaoke!!

    Categories: Tech Review Tags:

    Using WordPress for Twitter archival

    March 3rd, 2011 No comments

    Couple of weeks back @nedkumar came up to me asking for how i archive my tweet stream. While i was answering his question i realized i dont have good archival method. I use a combination of Instapaper, Evernote (love it!!), tweet favs and once in a month tweetbackup. Then i realized there should be a way where i can automate this process and not have to give away my data to others (like tweetbackup). So over the weekend i explored. WordPress is a very easy for me to setup and fairly comfortable playing with to make it do what i might need. I also knew that i can get RSS for tweet searches and user profiles given these two i started playing around. Quickly i bumped into twitter tools, it communicates to twitter fairly straight forward and then you have an option to make every tweet of yours as a new blog post. On further looking i found this awesome instructions from Mike Bogle. He uses mainly FeedWordPress to do the job.

    After couple of hours of tweaking and tuning up my twitter archive is humming along well. I archive my most watched hashtags, my stream (including mentions, RTs) and my esteemed friend @mrch0mp3rs “Beard Trust” list. Twitter doesn’t give you rss for lists, i used http://twiterlist2rss.appspot.com/ to get the feed. Over the next few days i will continue to organize and build the site with more content.

    Friends if you want me to archive your stream let me know i will more than happy to do or teach you how to do it :).

    Categories: Tech Review, Tech Review Tags:

    .pst to .mbox

    December 23rd, 2009 No comments

    After a very long time it was nice to do some real geekery stuff. I recently got a MBP, i was on PC for the last two years at work. I started porting all my PC stuff to mac everything was going smooth until i was at a point of transferring all my old email from Outlook 2007 to Entourage 8. I started this project 2pm this afternoon and after 5 hours of struggle finally managed to do it all.

    For those who have been this path before you would understand what i am talking about. There are few commercial tools for price that “claim” to do the job but there were also all sorts of errors that people reported. This is when the geek in me raises and said WTF its just data that need to be ported from one app to another app. Upon some serious search i found two libraries libpff and libpst these are opensource linux packages that convert any pff files and pst files to mbox exactly what i need. All is well so far, but here is where the real trouble beings. These packages need to be complied, configured and make files are to be run. So i have here summarized the steps. PLEASE FOLLOW THE INSTRUCTIONS TO THE DOT. I have done this on MBP running Snow Leaport (10.6.2).

    0. Check if you have gcc installed by opening Terminal and typing “which gcc” at the command prompt. It should return “/usr/bin/gcc” or another path where gcc is installed. If there is no response (as in Snow Leopard) that means gcc needs to be installed. Insert the Snow Leopard CD. Enter the “Optional Installs” folder. Run Xcode.mpkg. This should install gcc. Once the install is complete check again by running the command “which gcc” at the command prompt. Alternatively you can download xcode from ADC. You need to be a member to download. Don’t worry its a free to signup. I have downloaded mine here, http://developer.apple.com/tools/xcode/

    1. Download libpst source from http://www.five-ten-sg.com/libpst/packages/ (I downloaded libpst-0.6.45.tar.gz which was the latest version). It should automatically unzip in the folder you downloaded it into. Remember this directory path for later.

    2. In order to install libpst you also need to install “boost”. Download the latest source from the boost site here http://sourceforge.net/projects/boost/files/boost/ and download the latest version (mine was 1.41.0).

    3. Open Terminal and ‘su’ as root (you can also use sudo for each command from here on but su is easier in my mind. If you do not have a root account setup on you mac then google for the steps to activate it.) and “cd” to “/usr/local/” and run this command at the command prompt
    “tar –bzip2 -xf /your/download/directory/boost_X_XX_X.tar.bz2” (where X_XX_X represents the release number).

    4. Once that is complete you will see a directory now under “/usr/local/” called “boost_X_XX_X”. “cd” into this directory.

    5. At the command prompt type “./bootstrap.sh –prefix=/usr/local/”. This will take a few mins to run.

    6. Once that is done at the command prompt type “./bjam install”. This will take a while to run – 15 to 30 mins. Get a cup of coffee. Note: you will see some deprecated errors. Dont worry the package will be installed.

    7. At this point boost is installed. “cd” to the directory where you downloaded libpst-X.X.XX (Step 1).

    8. Type “./configure” at the command prompt. Once that is done type “make” at the command prompt. And once that is complete finish with “make install”.

    9. You have now successfully installed libpst. You should find libpst, readpst and pst2ldif under “/usr/local/bin” directory.

    10. Run this command at the command prompt in the directory you want the “mbox” created “readpst -r /path/to/the/pst/files/yourfile.pst” and you have successfully converted pst files to mbox. Piece of cake!. If you want to know the complete usage of readpst, here it is http://www.five-ten-sg.com/libpst/rn01re01.html

    You need to be well experienced working within terminal. Here are some tips for novice terminal users:

    1. How to turn on the root account?
    If you are in the admin account you should be able to change the root password. Just type “psswd root”

    2. How to see hidden files in finder?
    By default Mac OS shows only those files that are needed by user. But if you are familiar in Linux environments seeing all files is helpful. The only reason to hide files is to protect users from deleting important stuff. Type this in terminal “defaults write com.apple.Finder AppleShowAllFiles YES” and restart Finder. You can restart Finder by hold down the Option key, then click and hold on the Finder icon in the Dock.

    Hope you find these tips helpful. Save the money by not buying those COTS stuff, be bold and try this solution.

    Categories: General, Tech Review Tags: